Showing posts with label SharePoint Search. Show all posts

Friday, January 9, 2015

SharePoint Online: Search Image Preview Confirmation

There have been some comments on my original postings in regards to image search results and previews of images not stored in picture libraries. The original post is here.

The issue now is does this work in SharePoint Online? There is no way to add file types to search in SharePoint Online. I was thinking that maybe, behind the scenes, they had this corrected and all would be good. Nope!

Picture libraries seem to have full support for all image types (at least the usual suspects - gif, jpg, png).

Example Preview of Image in Picture Library


Example Preview of Image in Document Library


So this just confirms that images that are not stored in picture libraries do not get rendered as images in search results. Right now the only workaround I would think is to modify the document item search template and look for the file extension - similar to what I originally did for Problem #2 in this post. (my original solution was not actually needed because of an early bug where image result types were set to show default items).

Wednesday, December 10, 2014

SharePoint 2013 Search: Error Launching Query Builder - RESOLVED

Problem
When attempting to launch the query builder when creating a new Content Source or Result Source via Central Admin you receive an error as follows:

Error: Not able to connect to search service to retrieve valid settings.


Solution
You need administrator rights to the Search Service Application - even if you are a farm administrator. (I just recently encountered this issue but thought it worked before - I am thinking that recent patches and updates plugged a security hole).

Solution Implementation - PowerShell
You can solve this easily by running the following PowerShell script with your account name:

$principal = New-SPClaimsPrincipal "DOMAIN\USERNAME" -IdentityType WindowsSamAccountName

$spapp = Get-SPEnterpriseSearchServiceApplication

$security = Get-SPServiceApplicationSecurity $spapp –Admin

Grant-SPObjectSecurity $security $principal "Full Control"

Set-SPServiceApplicationSecurity $spapp $security –Admin 

Solution Implementation - Central Admin
You may also solve this via Central Admin.

From Application Management, click on the Manage service applications link under the Service Applications section:


Scroll down to your Search Service Application and select it:


On the SERVICE APPLICATIONS top ribbon, click the Administrators button:


In the Administrators dialog, enter the account that needs permissions and click the Add button:

Select the account in the list and grant Full Control:


Click OK.

The Query Builder dialog will now launch properly without any trouble.


Thursday, October 17, 2013

SharePoint 2013 Search: Changing Refinements from 'OR' to 'AND'

By default when you implement refiners in SharePoint 2013 Search, the search experience when selecting the multi-value refinements, the filtering of the search results follows "OR" logic. If you selected SharePoint and Visio, for example, the results will display all items that either contain SharePoint or contain Visio (or both). In some cases, the user may want to combine the values such that only items that contain both SharePoint and Visio are displayed.

I started looking into this within the refinement filter code but also asked two SharePoint buddies that have been working with refinements recently if they saw a way to do this. They both came up with the same solution.

The first response and more detailed solution came from CCDW.

Here is the solution (based on modifying the system function in place) - the right way to implement this is discussed after the initial discovery:

PART I - Javascript Function

Step 1:  Locate the Search.ClientControls.js file in C:\Program Files\Common Files\Microsoft Shared\Web Server Extensions\15\template\layouts.

Step 2: Open the debug version of this file and locate the following line:

Srch.Refinement.submitMultiRefinement = function Srch_Refinement$submitMultiRefinement(name, control, useContains, useKQL) {

and change to:

Srch.Refinement.submitMultiRefinement = function Srch_Refinement$submitMultiRefinement(name, control, useContains, useKQL, searchBoolean) {

Here we are adding a fifth parameter named searchBoolean which we will use to pass in AND or OR

Step 3: Check  to see if the parameter was passed.

Add this line in the function:

searchBoolean = searchBoolean || 'OR';

If the parameter is not passed, we set it to the original default value such that it continues to work with legacy code.

Step 4: Change the last line to:

$v_0.updateRefinementFilters(name, $v_3, searchBoolean, useKQL, $v_4);

We've overridden the original hardwired 'OR', to our searchBoolean param!

PART 2 - Display Template

Step 1: Edit the Filter_MultiValue_body.html display template (technically you should create a copy and then set the refinement to use your custom multi-value refinement)

Step 2: Locate this section around line 90:

 <div id="SubmitValue">
                        <div id="submit">
                            <a onclick="Srch.Refinement.submitMultiRefinement('_#= $scriptEncode


Step 3: Change the onclick to:

onclick="Srch.Refinement.submitMultiRefinement('_#= $scriptEncode(propertyName) =#_', $getClientControl(this), _#= $htmlEncode(useContains) =#_, _#= $htmlEncode(useKQL) =#_,'AND');

Add a fifth string param to the function in the last line. Note I have added the 'AND'. The AND (or OR) will be passed as the searchBoolean param in the function within the mods made earlier.  If we don't pass anything the default is applied in the function.

Reset IIS to be sure and it should now work!!


The correct way to implement this is to copy the function and paste it into the refinement template. In working with Mikael Svenson (Microsoft MVP) on the same problem, he added these example steps (which I modified to flow with CCDW's answer):

What you would do in your refinement template is something like this:

Type.registerNamespace('TheMan.Search');
TheMan.Search.submitMultiRefinement = function(name,control,useContains, useKQL, searchBoolean) {
 // copy the contents from search.clientcontrols.debug.js
 // change the last line to use searchBoolean instead of "OR"  (as explained in Part I - Step #4 above)
}


Then change your onclicks to read TheMan.Search.submitMultiRefinement() instead of Srch.Refinement.submitMultiRefinement()


HOPE THIS HELPS!!! SEARCH ON!


Thursday, May 23, 2013

SharePoint 2013: Consistent Search Results with Synonyms and Query Rules

When I took a class called "Information Retrieval Systems" back in the 90's at Drexel University I never thought I would have to deal with what we learned directly. While the course covered things like stop words (noise words), lingusitics, synonyms, and basic retrieval of information, it really was the foundation for what search engines are built around today.

My professor's classic example was "Time Flies Like an Arrow" and "Fruit Flies Like an Apple". In the first phrase we want "flies" to be a verb but in the second phrase we want "flies" to be a plural noun. Also, "like" means similiar in the first phrase but means enjoys in the second. Hmmm...to a computer-based search engine they are words that will be searched against a content index and there really is no context around the meanings.

Same problem exists today when users want searches to produce the results they expect versus what the search engine actually finds and deems relevant. The specific problem I solved in SharePoint 2013 Search dealt with searching for "401K".

There are several ways someone may search for 401K ->  401K, 401 K, 401-K, and 401(K). Each of these phrases without any tinkering will produce a different set of results. I found that 401K and 401(K) produced the same number of results essentially because the parenthesis are ignored. So at least I had that covered.

The main problem is "401 K" because of the space. This produces results where there is just a 401 by itself or maybe a K by itself (as a middle initial for example). The "401-K" also produced different results as some content may actually contain the dash.

I originally thought this could all be solved just by using synonyms in my SharePoint 2013 Search thesaurus file (which you upload into Search using PowerShell). That was not the case. Then I thought I could solve the problem with a query rule - also not the case.

It turns out I needed to use a combination of thesaurus entries and a query rule to get the exact same number of results for any 401K combination. The ranking may change based on which version the user enters but as long as they get all of the possible results for each version we are making fruit fly.

Since 401K and 401(K) are treated the same, my thesaurus file contained the following:

Key,Synonym,Language
401 K,401K
401 K,401-K
401K,401 K
401K,401-K
401-K,401K
401-K,401 K

My condition for the query rule was based on if any version of 401K was entered:


The action for the query rules was to change the ranked results by changing the query:


Essentially I am using quotes to produce exact matches in the content which eliminates any extra results and, by combining with OR statements, I am assuring I get everything out there no matter how 401K is represented.
 
I really thought the query rule by itself would solve the problem but the synonyms helped seal the deal:


My SharePoint 2013 Search instance is now displaying the same number of results with each version of the search term.


Tuesday, May 21, 2013

SharePoint 2013 Search: Adding Managed Properties to Display Templates

Based on some feedback from a previous post, a reader commented that it would be nice to see how to add managed properties to a search display template. The most common method is a one-to-one mapping, however, you may link a search result item property to multiple managed properties. This post explains both methods.

While the recommended approach is to use Design Manager to upload display templates, I find it much easier to make copies and modifications using SharePoint Designer 2013. You may access the search display templates from SharePoint Designer 2013 using the method explained in this post.

One-to-One Mapping

Each Search display template contains default managed properties. They appear in the <mso:ManagedPropertyMapping> tag at the top of each template:


{Click on image to see larger view}
Sometimes when making copies of the templates or modifying existing ones, the quotes become http encoded:

{Click on image to see larger view}


It doesn't matter as either way will work. The syntax for one-to-one mapping is as follows:

 
'<<property name to be used in current item>>':'<<managed property name>>'
 
 
To add a new managed property, simply add another entry. For example, if I had a managed property named "CustomerID", I would add 'CustomerID':'CustomerID', to the <mso:ManagedPropertyMapping> tag:


For maintainability it is recommended to name the current item property name the same as the managed property name. Once that is added, you may now use the new property by referencing it from the current result item:
 
ctx.CurrentItem.CustomerID
 
Once you save your changes, you need to update your result type such that the query component knows which properties need to be returned for the search result.
 
 
One-to-Many Mapping
If you take a look at the Item_Video_CompactHorizontal.html template, you'll notice that they are mapping a search result item property to multiple managed properties:
 
{Click on image to see larger view}
The syntax here is a little different:
 
'<<search result item property name>>'{search result item property name}:'<<list of managed properties>>'
 
The list of managed properties are separated by semicolons. I am assuming that the value of the search result item is populated with the first managed property that has a value based on the order listed.
 
To use the managed property value within the template code/mark-up, you must get the value from the context:
 
var imageURL = $getItemValue(ctx, "Picture URL");


Monday, May 20, 2013

SharePoint 2013 Search: Modifying Promoted Result Displays

A question came up during my Search sessions at SPS Baltimore this past weekend. It was in regards to Promoted Results taking the place of Best Bets and the icon being used.

The icon is no longer a star but a blue check mark:

Search uses the Item_BestBet display template to present these promoted results. You may find the template in your Search Display Templates folder:


You may make modifications to this template to change how promoted results are rendered. The specific question dealt with the icon. There is a div and an img tag located in the template file:


This is using a sprite image named searchresultsui.png which is made up of various icons that are used within the search results. Obviously it is using the blue checkmark portion of the sprite. If you wanted, you could modify the image tag to use a different image as the promoted results icon.


Monday, April 22, 2013

Stemming in SharePoint 2013 Search

Stemming essentially performs searches for words that share the same stem. Stemming in SharePoint 2013 is enabled by default and although it can be disabled, there is no UI option in the Search Results Web Part anymore. In addition, the EnableStemming property in the object model is also deprecated.

To disable stemming you need to:
  1. Export a Search Results Web Part
  2. Open the file in a text editor
  3. Set the EnableStemming property to false ("EnableStemming":false)
  4. Save the file
  5. Import the web part back onto the search results page
  6. Remove the existing web part from the search results page

While classic examples of stemming are explained as “run” and “ran” as well as “writes” and “wrote”, the results I am seeing are not so. The behavior I am experiencing in SharePoint 2013 is mostly plural and singular versions of words. For example “party” also presents results for “parties” (and vice-versa). “Search” is providing hits on “search” and “searches” but not “searcher”. I am not seeing "wrote" hits when I search for "write" nor do I see "ran" results when I search for "run".
Since there is no longer support for third-party stemming tools (and thus the previous registry entries are no longer used), the workaround to all of this is to include any additional stemming as synoynyms in a thesaurus file which may be loaded into SharePoint via PowerShell commands.

I have crawled 100GB of content so I should have a great sampling of words. Has anyone seen anything different with stemming?


Monday, March 25, 2013

SharePoint 2013 Search: Fixing an Orphaned Search Component

Problem/Scenario
You previously moved a search component (e.g. Query Processing Component) to a web front end (WFE). For other issue resolutions, you needed to disconnect and then reconnect the WFE server to the SharePoint Farm. In reviewing the current Search Topology, there is an issue with the Query Processing Component:


Resolution

Run PowerShell as Administrator and load the SharePoint snap-in
(or run SharePoint 2013 Management Shell as Administrator):

Add-PSSnapin Microsoft.SharePoint.PowerShell -ErrorAction SilentlyContinue

Get the Search Service Application and clone the search topology:

# Clone the active search topology
$ssa = Get-SPEnterpriseSearchServiceApplication
$active = Get-SPEnterpriseSearchTopology -SearchApplication $ssa -Active
$clone = New-SPEnterpriseSearchTopology -SearchApplication $ssa -Clone –SearchTopology $active


Issue the following to review the cloned topology:

Get-SPEnterpriseSearchComponent -SearchTopology $clone

Locate the search component (e.g. QueryProcessingComponent) entry with the missing ServerName and copy the ComponentId:


Remove the component by using the ComponentId above as the -Identity value in the following:
# Remove Orphaned Component
Remove-SPEnterpriseSearchComponent -Identity d8450c12-09a8-4aa4-b824-b709a7a852e0 -SearchTopology $clone -confirm:$false
 
 
Add a new search component component using the respective cmdlet:
# Add New Search Component
$wfe = Get-SPEnterpriseSearchServiceInstance -Identity "<<wfe name here>>"
New-SPEnterpriseSearchQueryProcessingComponent -SearchTopology $clone -SearchServiceInstance $wfe
 
 
Activate the search topology:
# Activate  Search Topology
Set-SPEnterpriseSearchTopology -Identity $clone
 
 
That's it! Refresh the search service application page and life is back to good:


Wednesday, March 20, 2013

SharePoint 2013/2016: Adding People to Everything Search Results

Once again, the main search results, which is now called Everything, does not include People search results. So it's not really everything. The reason is because there is a special People Search Results web part that is catered towards the User Profiles and their respective properties. If I searched for my last name, my personal profile result does not appear:


It's all good. With the the SharePoint Search capabilities, you can add some people results into my main search (Everything). First go to the site settings of your Search Center and under Site Collection Administration click on Search Query Rules:

 Select Local SharePoint Results (System) in the Context drop-down:


Once that is selected, click on New Query Rule:


On the Add Query Rule page, add a rule name, remove the condition, and then click on the Add Result Block link:


On the Add Result Block page change the Title to state "People Results". In the Select this Source, select Local People Results (System) and select the amount of items. The default is 2 and that's probably not enough (just like beer or martinis). 3 or 5 seem like good numbers.


Under the Settings section, as shown above, select the "More" link option and enter "peopleresults.aspx?k={subjectTerms}". Select People Item from the Item Display Template. Click OK.


Back on the Add Query Rule page, click Save.

Run your search again (it may take a moment for the changes to appear):

The People Results were modified in the above screen shot to protect real people information.


Now I have people results appearing in the search results under Everything!!!


Friday, February 22, 2013

SharePoint 2013: Image Preview in Search Results - Part I

I was discussing SharePoint Search previews of images on Twitter with Jasper Oosterveld . The discussion made me look into image previews in search results. As a result, I looked at various options and functionality to this regard. I am splitting these posts into at least two parts so I can get part of my solution out as soon as possible. This post solves the previewing of images that are not in Picture Libraries.

UPDATE: Get the source files here

Previewing of Images Not Stored in Picture Libraries

Problem #1: Image Search Results Are List Items

When images are stored in "regular" document libraries such as Site Assets, they are uploaded as documents. When the library is crawled, the results are the actual list item and not the image itself. Even if you add the Image or Picture content type to the library and modify the item, the result is still treated like a list item.

Solution to Problem #1:  Add Image File Types to Search
The reason the images are coming back as items is because image file types such as .jpg and .gif are not in the list of the search file types.

So you need to go to Central Administration and modify the Search Service Application. On the left hand side click on File Types:


On the File Types page, click on New File Type:


Enter an image file type such as jpg and click ok:


Repeat the process for other image types you want to handle.

Now go to the document library that contains the images and select Library settings from the Library top ribbon:


On the Settings page, click on Advanced Settings:


Scroll down and find the Reindex Document Library button and click it:


In the dialog that appears, click Reindex Document Library:

Click OK on the Advanced Settings page.

Now return to your Search Service Application and run an incremental crawl on the main content source:


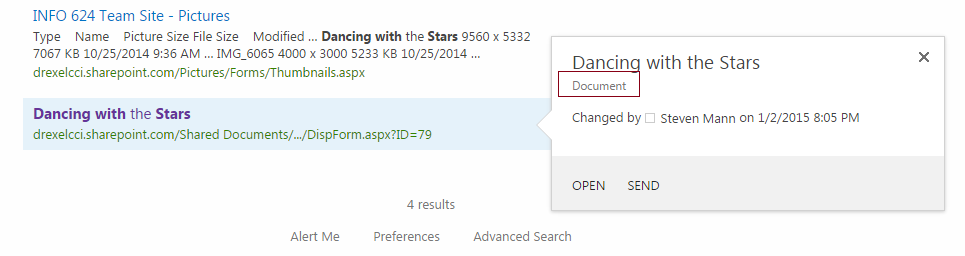
After the crawl is completed, the search results of the images should appear as their filename instead of a list item. That solves that problem but the hover is still the Default hover template and doesn't show an image preview.


Problem #2: Image Search Results Hover Doesn't Show Preview
Now that the search is crawling image types, the results display the image file but the hover is using the default item template and no image appears.
  

UPDATE: You do not need to go through the modification of the default hover although I did in the beginning before I figured out all that was happening. The overall cause of this issue is that Image result type uses the Default Item template and not the Picture template. My solutions in Part II and Part III explain how do implement this better.


Solution to Problem #2: Modify the Default Hover Panel Display Template
The solution here is to modify the hover display template that is being used for default items. This can be easily performed using SharePoint Designer 2013. Follow the steps to get to the Display Templates as I have outlined previously.
This time, edit the Item_Default_HoverPanel.html file. Replace the RenderBody section with the following code:

                <!--#_
                    if(ctx.CurrentItem.FileExtension == "jpg" || ctx.CurrentItem.FileExtension == "gif"){
_#-->
                        <div class="ms-srch-hover-imageContainer">
                            <img id="_#= ctx.CurrentItem.csr_id =#_" src="_#= $urlHtmlEncode(ctx.CurrentItem.Path) =#_" onload="this.style.display='block';" />
                        </div>
<!--#_
                }
                else {
_#-->
    <div id="_#= $htmlEncode(id + HP.ids.body) =#_" class="ms-srch-hover-body">
                    _#= ctx.RenderBody(ctx) =#_
                </div>
<!--#_
                }
_#-->


You may add more conditions for each file type you want to handle. You could also check the content type however, by default, the images loaded to Site Assets are documents. So if you want to capture all images I would use the file extension check.

Save those changes and then perform a search. Hover over the image results:


Voila!!! The hover shows a preview of the image!!!

But that's not all folks. If you have Picture Libraries you could have even better results and previews but then that change will negate the solution provided here. I discuss this functionality and customization in my Part II post.


Friday, January 25, 2013

SharePoint 2007/2010/2013: Dynamic Time Zones in Search Results

Scenario
There is a centralized calendar in SharePoint which contains various events across offices around the world. Each office may have it's own time zone. The user experience is that they should be able to search and filter these events thus involving a search scope and customized search results.

The SharePoint servers are in the Eastern time zone and have that setting. All events are being stored in EST. (UPDATEAll events are stored in SharePoint as UTC. The date/time is then converted to the timezone of the user viewing the event item based on their regional settings at the site collection level - at least in MOSS 2007. Since our service account is EST, we retrieve all times in EST from the web service). A web service queries the events calendar list and produces search results accordingly using custom metadata properties mapped to the crawled web service properties via BDC/BCS.

Problem
If all meetings and events are stored as EST, and the web service just returns the start and end times, those times will all be EST. However, since there are offices all around the world, that means there are users all around the world. So the problem is that the search results should display the time of event based on the user who is viewing the events.

Workaround/Solution/Hack
Because I was locked into search results already I had to go that route. This could have been easily resolved if I had some sort of MVC application running and use javascript to dynamically calculate the event time client-side.

So instead, I had to modify the the web service to produce the start and end times for each time zone in which there was an office. For example, DisplayStartTimeEST would store the Eastern time, and DisplayStartTimePST would store the Pacific time. I then added all of these new fields to the BDC/BCS definition and crawled the content source. I mapped new metadata properties to the underlying crawled properties of the web service.

In the search results XSLT, I essentially show every time zone within a <div> whose (style) classes match the time zone. The style classes are all set to be hidden.

The style example is shown here:

The HTML in the XSLT looks like the following:


So the only thing left to do is figure out the user's time zone (based on their machine setting) and then show the proper time zone value. To get the time zone, I used the jsTimeZoneDetect code available here. Then I all I had to do is add a javascript function to show the proper <div> based on the time zone that was determined. I placed this code on the search results page via a Content Editor Web Part (since it was SharePoint 2007):
 
 
Results


With my machine set to Eastern Time, I saw the search results in EST:


I then changed my time zone to Pacific:


When I refresh the search results, I now see the event time in PST:


Conclusion
My solution is a hack but it works!!! So to wrap up, the solution basically is to bring back all time zones in the search results and then only show the correct one based on the user's time zone setting. Using a different display mechanism other than search results and calculating the time zone on the fly would be a more elegant solution but I had to work with what I was given.


Matched Content