Wednesday, October 30, 2013

SharePoint 2013: Getting Around Publishing Activation Errors

This post helps you force Publishing to activate on a site collection if you are having issues doing so via the UI. While my particular scenario is specific to a certain case, the solution should resolve most Publishing activation errors.

We had a site collection that incorporated some search functionality. (If you want to create custom search templates and have them work correctly, it is best to have Publishing activated). Anyway, on this site collection, Publishing was previously activated and then one day it wasn't. Attempting to reactivate Publishing from the Site Collection Features produced an error:


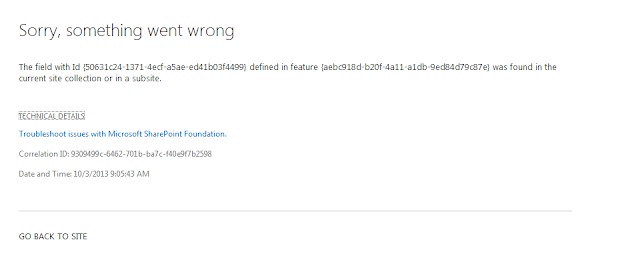
The field with Id {50631C24-1371-4ECF-A5AE-ED41b03F4499} defined in feature {AEBC918D-B20F-4a11-A1DB-9ED84D79C87E} was found in the current site collection or in a subsite.

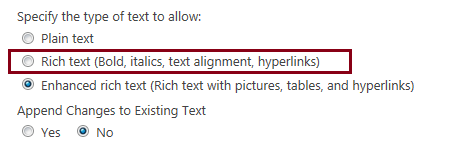
The specific feature is the Publishing Resources feature which is part of the Publishing Infrastructure. The field is a Publishing Column used to determine whether a page should be hidden from internet search engines:


This column appears to have been created within the August 2013 Cumulative Update. So my main activation issue was that this column type already existed in the site collection.

Since I was having some wacky search template issues, I really needed Publishing activated to correct the templates. We had a handy-dandy batch file from our MOSS 2007 environment which uses STSADM to activate publishing:

SET URL="http://sp2013/sites/PubSite"

SET STSADM="c:\Program Files\Common Files\Microsoft Shared\web server extensions\15\BIN\STSADM.exe"
%STSADM% -o activatefeature -filename publishing\feature.xml -url %URL% -force
%STSADM% -o activatefeature -filename publishingresources\feature.xml -url %URL%  -force
%STSADM% -o activatefeature -filename publishingSite\feature.xml -url %URL% -force
%STSADM% -o activatefeature -filename publishingweb\feature.xml -url %URL% -force
%STSADM% -o activatefeature -filename publishinglayouts\feature.xml -url %URL% -force
%STSADM% -o activatefeature -filename navigation\feature.xml -url %URL% -force

pause
This still worked in SharePoint 2013 even though I should have used PowerShell:

$url="http://sp2013/sites/PubSite"
Enable-SPFeature -Identity publishing -url $url -force
Enable-SPFeature -Identity publishingresources -url $url  -force
Enable-SPFeature -Identity publishingSite -url $url -force
Enable-SPFeature -Identity publishingweb -url $url -force
Enable-SPFeature -Identity publishinglayouts -url $url -force
Enable-SPFeature -Identity navigation -url $url -force

pause

We previously had to run the batch file twice in MOSS 2007 because of the ordering of the feature activation, however, in SharePoint 2013 I just had to run it once!


Monday, October 28, 2013

SharePoint 2013: Cleaning Up Inactive Search Topologies

I woke up Saturday morning with a text message from a SharePoint friend:

"Hey, if u have 2 search topologies, one active and one inactive, can you delete the inactive one?"

I was thinking that this was only in memory since you create clones of the current search topology and then activate it after making appropriate changes. Nope. Every time you update the search topology, the previous one becomes inactive and sticks around in the search database.

You can view your inactive topologies using the following PowerShell command line:

Get-SPEnterpriseSearchServiceApplication | Get-SPEnterpriseSearchTopology |? {$_.State -eq "Inactive"}


With all of my scale-out activities, I had 33 inactive search topologies - doh!

Expanding upon the previous PowerShell command line, you can easily remove all of these:

Get-SPEnterpriseSearchServiceApplication | Get-SPEnterpriseSearchTopology |? {$_.State -eq "Inactive"} |% { Remove-SPEnterpriseSearchTopology -Identity $_ -Confirm:$false};


You may run the first command line again to verify there are no more inactive search topologies.


Thanks to Chris Rumel for posting this quick PowerShell code here.


Friday, October 18, 2013

SharePoint 2013: Migrating InfoPath 2007 Form Text Display Issue

Scenario: You open an InfoPath 2007 form in InfoPath Designer 2013. You publish it to SharePoint 2013.

Problem:  When rendering the form in SharePoint 2013, the text and/or background colors do not display correctly:


Resolution:

1. Open the form in InfoPath Designer 2013.

2. Select some text on the form and click on the Normal font format. (It may already be selected but click it anyway).


3. You will be prompted to update the template. Click Yes:


4. Save the form changes and re-publish the form to SharePoint 2013.

Form rendering is now corrected:


Thursday, October 17, 2013

SharePoint 2013 Search: Changing Refinements from 'OR' to 'AND'

By default when you implement refiners in SharePoint 2013 Search, the search experience when selecting the multi-value refinements, the filtering of the search results follows "OR" logic. If you selected SharePoint and Visio, for example, the results will display all items that either contain SharePoint or contain Visio (or both). In some cases, the user may want to combine the values such that only items that contain both SharePoint and Visio are displayed.

I started looking into this within the refinement filter code but also asked two SharePoint buddies that have been working with refinements recently if they saw a way to do this. They both came up with the same solution.

The first response and more detailed solution came from CCDW.

Here is the solution (based on modifying the system function in place) - the right way to implement this is discussed after the initial discovery:

PART I - Javascript Function

Step 1:  Locate the Search.ClientControls.js file in C:\Program Files\Common Files\Microsoft Shared\Web Server Extensions\15\template\layouts.

Step 2: Open the debug version of this file and locate the following line:

Srch.Refinement.submitMultiRefinement = function Srch_Refinement$submitMultiRefinement(name, control, useContains, useKQL) {

and change to:

Srch.Refinement.submitMultiRefinement = function Srch_Refinement$submitMultiRefinement(name, control, useContains, useKQL, searchBoolean) {

Here we are adding a fifth parameter named searchBoolean which we will use to pass in AND or OR

Step 3: Check  to see if the parameter was passed.

Add this line in the function:

searchBoolean = searchBoolean || 'OR';

If the parameter is not passed, we set it to the original default value such that it continues to work with legacy code.

Step 4: Change the last line to:

$v_0.updateRefinementFilters(name, $v_3, searchBoolean, useKQL, $v_4);

We've overridden the original hardwired 'OR', to our searchBoolean param!

PART 2 - Display Template

Step 1: Edit the Filter_MultiValue_body.html display template (technically you should create a copy and then set the refinement to use your custom multi-value refinement)

Step 2: Locate this section around line 90:

 <div id="SubmitValue">
                        <div id="submit">
                            <a onclick="Srch.Refinement.submitMultiRefinement('_#= $scriptEncode


Step 3: Change the onclick to:

onclick="Srch.Refinement.submitMultiRefinement('_#= $scriptEncode(propertyName) =#_', $getClientControl(this), _#= $htmlEncode(useContains) =#_, _#= $htmlEncode(useKQL) =#_,'AND');

Add a fifth string param to the function in the last line. Note I have added the 'AND'. The AND (or OR) will be passed as the searchBoolean param in the function within the mods made earlier.  If we don't pass anything the default is applied in the function.

Reset IIS to be sure and it should now work!!


The correct way to implement this is to copy the function and paste it into the refinement template. In working with Mikael Svenson (Microsoft MVP) on the same problem, he added these example steps (which I modified to flow with CCDW's answer):

What you would do in your refinement template is something like this:

Type.registerNamespace('TheMan.Search');
TheMan.Search.submitMultiRefinement = function(name,control,useContains, useKQL, searchBoolean) {
 // copy the contents from search.clientcontrols.debug.js
 // change the last line to use searchBoolean instead of "OR"  (as explained in Part I - Step #4 above)
}


Then change your onclicks to read TheMan.Search.submitMultiRefinement() instead of Srch.Refinement.submitMultiRefinement()


HOPE THIS HELPS!!! SEARCH ON!


Wednesday, October 16, 2013

SharePoint 2013/2016: Adding a Rich Text Column to a List Using CSOM

When you add a rich text column to a list from the SharePoint UI, you select Multiple lines of text as the type of information:


Towards the bottom, you have two type of text options, Plain text or Enhanced rich text:

After you create the column and go back in to edit the properties, you now get a third "in-between" Rich text option:


I needed to add a rich text column programatically to a list using the client side object model (CSOM). I found general guidelines for adding a field to a list here on MSDN.

Based on that post, I followed suit and constructed my code:

Field styleField = list.Fields.AddFieldAsXml("<Field DisplayName='Style' Type='Note' />", true, AddFieldOptions.DefaultValue);
FieldMultiLineText fieldMultiLineText = context.CastTo<FieldMultiLineText>(styleField);
fieldMultiLineText.RichText = true;
fieldMultiLineText.AllowHyperlink = true;
fieldMultiLineText.UpdateAndPushChanges(true);
list.Update();
context.ExecuteQuery();

I knew what the real type of Field the object was so I casted it to FieldMultiLineText. This allowed me to set the RichText property to true. However, upon generation, the settings of the column where just the regular Rich Text:


This was actually what I needed but I thought, how do you create one as Enhanced rich text? There is a RichTextMode property but it is not exposed in a FieldMultiLineText object. After trying several different things, I just decided to read the properties of a created Enhanced rich text column and use the SchemaXML to generate the new field:

Field rtfField = list.Fields.AddFieldAsXml("<Field DisplayName=\"Enhanced RTF\" Type=\"Note\" RestrictedMode=\"TRUE\" RichText=\"TRUE\" RichTextMode=\"FullHtml\" RowOrdinal=\"0\" Required=\"FALSE\" EnforceUniqueValues=\"FALSE\" Indexed=\"FALSE\" NumLines=\"6\" IsolateStyles=\"TRUE\" AppendOnly=\"FALSE\" />"
, true, AddFieldOptions.DefaultValue);

rtfField.UpdateAndPushChanges(true);list.Update();
context.ExecuteQuery();


RestrictedMode=\"TRUE\" RichText=\"TRUE\" RichTextMode=\"FullHtml\"
I believe that these properties are the key to creating it properly. I did not perform any casts as it seemed that was working against me. Once I just used the Field object and the XML, all was good:


SharePoint 2013: Creating a New List Item Using the Client-Side Object Model (CSOM)

I have been working on a provider-hosted app for SharePoint 2013 which needs to create lists and add some default items if they do not exist. I therefore am using the client-side object model (CSOM) in order to accomplish this.

It seemed like everything was spelled out for me on this MSDN post: http://msdn.microsoft.com/en-us/library/fp179912.aspx

However, when attempting to access the Items collection on the list, I received an error:


'Microsoft.SharePoint.Client.List' does not contain a definition for 'Items' and no extension method 'Items' accepting a first argument of type 'Microsoft.SharePoint.Client.List' could be found (are you missing a using directive or an assembly reference?)


I thought I was in trouble but then I noticed that the List object had an AddItem method. So pretty simple fix, I just needed to change my syntax from list.Items.Add to just list.AddItem:


This worked like a charm.

The corrected full example  should therefore be:

// Starting with ClientContext, the constructor requires a URL to the
// server running SharePoint.
ClientContext context = new ClientContext("http://SiteUrl");

// Assume that the web has a list named "Announcements".
List announcementsList = context.Web.Lists.GetByTitle("Announcements");

// We are just creating a regular list item, so we don't need to
// set any properties. If we wanted to create a new folder, for
// example, we would have to set properties such as
// UnderlyingObjectType to FileSystemObjectType.Folder.
ListItemCreationInformation itemCreateInfo = new ListItemCreationInformation();
ListItem newItem = announcementsList.AddItem(itemCreateInfo);
newItem["Title"] = "My New Item!";
newItem["Body"] = "Hello World!";
newItem.Update();

context.ExecuteQuery(); 


Sunday, October 6, 2013

SharePoint 2013/2016: Adding a Blog to an Existing Site (without creating a new site)

Typically when you want a blog in SharePoint, you need to create a new site collection or a subsite using the Blog site template.


Sometimes it would just be easier (or nice) to have a blog right in another site such as a team site or departmental site without the need for yet another site collection or subsite to maintain. No problem.

You can easily add a blog to an existing site using PowerShell. Fire up the SharePoint 2013 Management Console and enter the following command:

Enable-SPFeature -identity "BlogContent" -url <<the url of the site>>


Next, navigate to the site in the browser and edit the home page:


From the Insert tab on the top ribbon, click on Web Part:


Select Posts from the Apps category and click on the Add button:


The blog posts now appear on your home page:


Click on the sample blog post:


You now have a blog in your existing site without having a separate subsite!


Tuesday, October 1, 2013

SharePoint 2013: Server Farm Products and Patch Status Issue

Problem/Scenario:
You just applied one or more patches to your SharePoint 2013 farm and are ready to run the SharePoint 2013 Products Configuration Wizard. After launching the configuration wizard you receive a patch status error:


Some farm products and patches were not detected on this or other servers.

You know you just installed these so what's going on?

Resolution:
As long as you have installed all of the same patches on all servers, your farm just needs a refresh of the product versions.

First, cancel from the configuration wizard and make sure the timer jobs are running on all servers:

 
Next, in Central Admin, select Monitoring from the left-hand navigation and click the Review Job Definitions link under Timer Jobs:


On the Job Definitions page, scroll down and locate the Product Version Job:


Click on the Product Version Job link to open the job definition. Click on Run Now at the bottom of the page:


Now run the SharePoint 2013 Products Configuration Wizard again. You should be able to run it fully without any issues.


Matched Content