Monday, August 1, 2011

Adding a Custom Domain to Office 365

If you have not registered for a custom domain, you may use the many providers on the internet such as the Domain Registry of America (www.droa.com). You will first need to determine if the domain name is available and then go through the purchasing procedures accordingly. Since I already have stevethemanmann.com and use that for my blog site, for my walkkthrough guide I created a new domain of “stevethemanmann.net”. After making the purchase, it could take several hours before your domain name is ready and available for configuration.

When you know your domain name is ready, return to your Office 365 home page and click on the Admin menu item at the top of the page.
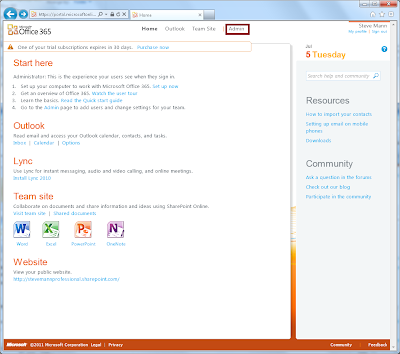


The Admin screen appears. Under Get your team started, click on the Add and verify your domain.
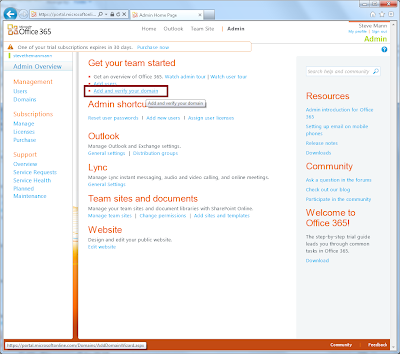


The Add a Domain screen appears. Enter your custom domain in the text box and click Check domain.
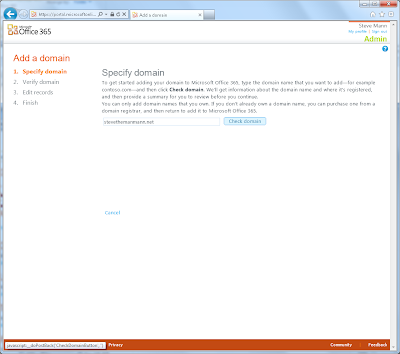


Your domain will be verified and a Domain Verification appears on the screen.
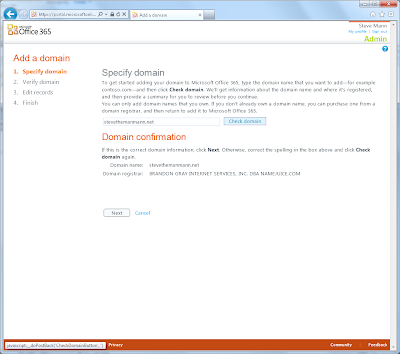


Click Next. The Verify Domain screen appears. Although the TXT record method is preferred, in my case I needed to use the MX record method. Read the directions carefully on this screen.
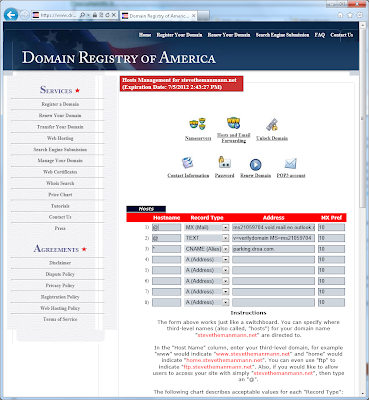


 You need to modify the host settings within your domain configuration from your provider.


Once you modify the settings, return to the Verify Domain screen and click Verify. You may need to wait a few minutes before your domain can be verified. 

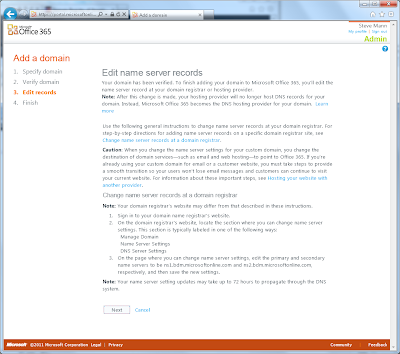
Once verified, the Edit Name Server screen appears. Read the directions carefully. Again you will need to configure your domain and modify the Nameservers settings.
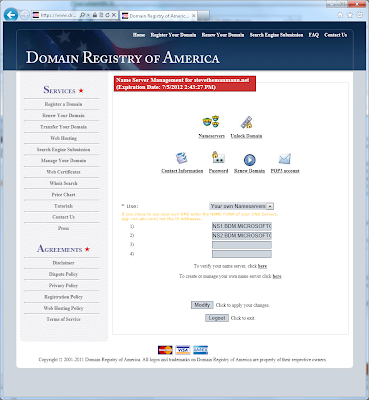


The Nameserver names are listed on the Office 365 screen (in Step #3). Enter these values into your domain configuration and accept the changes.

Back on the Office 365 screen, click Next. The Domain is added and a confirmation screen appears.
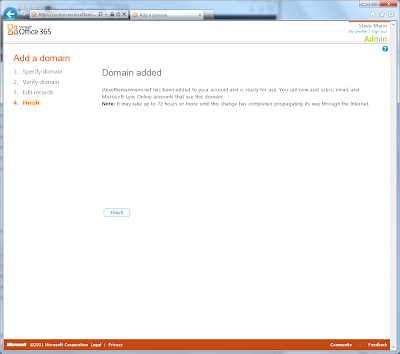


Click Finish. The Domains screen appears and now your custom domain is listed.


Catch more Office 365 steps in Steve's Office 365 Walkthough Guide.

Follow Steve on Twitter @stevethemanmann


Using the Rad Ajax Loading Panel in SharePoint with a Rad Grid

I implemented a Rad Grid which contained two levels of information within a user control that is being rendered in SharePoint (MOSS 2007). I therefore used coding and markup as explained on the Telerik demo site here. When expanding the master rows to expose the "child" rows, the detail data is loaded on demand via the DetailTableDataBind event. In our situation this took a few seconds and therefore I wanted something to show that data was loading. Enter the Rad Ajax Loading Panel.

The RadAjaxLoadingPanel object looked like a great fit. By default it presents a nice loading animation similiar to what I have seen in Silverlight. I therefore attempted to implement the loading panel for my situation. I followed examples as explained here.

While running the example code locally within a .NET Framework environment, the Rad Ajax Loading Panel worked like a charm. However, when attempting to run the same code within SharePoint, I was not so lucky. At first I was seeing the loading panel on the first postback but never again and in certain configurations based on examples, I did not see it appear at all.

Finally, I was able to get it all to work within SharePoint. Here is how my markup ended up being structured:

1) First I declared the RadAjaxLoading Panel.
<telerik:RadAjaxLoadingPanel runat="server" ID="RadAjaxLoadingPanel1" MinDisplayTime="200" ZIndex="1" EnableTheming="false" Skin="Default">
</telerik:RadAjaxLoadingPanel>

2) Next I needed to wrap everything else within a RadAjaxPanel. I believe this was the key to having everything work in SharePoint.

<telerik:RadAjaxPanel runat="server" ID="AjaxPanel">

3) Now comes the RadAjaxManager which controls when to show the loading panel. <telerik:RadAjaxManager ID="RadAjaxManager1" runat="server"
EnablePageHeadUpdate="False">
  <AjaxSettings>
    <telerik:AjaxSetting AjaxControlID="RadGrid1">
      <UpdatedControls>
         <telerik:AjaxUpdatedControl ControlID="RadGrid1" LoadingPanelID="RadAjaxLoadingPanel1" />
      </UpdatedControls>
     </telerik:AjaxSetting>
   </AjaxSettings>
</telerik:RadAjaxManager>

4) Then I have all my grid goodness which I will spare all the details.

<telerik:RadGrid ID="RadGrid1" runat="server" Width="100%" ShowStatusBar="true" AutoGenerateColumns="False" AllowSorting="True" AllowMultiRowSelection="False"
AllowPaging="True" OnDetailTableDataBind="RadGrid1_DetailTableDataBind" OnItemDataBound="RadGrid1_ItemDataBound"
OnNeedDataSource="RadGrid1_NeedDataSource" EnableEmbeddedSkins="false" EnableViewState="true">

.......GRID MARKUP HERE
</telerik:RadGrid>


4) Finally I have the closing RadAjaxPanel tag.
</telerik:RadAjaxPanel>


This sequence of markup allowed the loading panel animation to display everytime there was a postback to get the detail data without refreshing the entire page within SharePoint. As I said above, I think the key was wrapping the Ajax Manager and the Rad Grid within a Rad Ajax Panel which was not needed or shown in the Telerik demos.
If you found this useful, please help support my SharePoint and .NET user group (Philly SNUG) by clicking on the logo below.

Tuesday, July 26, 2011

Adding Telerik RAD ToolTips to Your SharePoint Search Results

We have heavily customized Search results in MOSS 2007. We wanted to present a tooltip pop-up when the users hover over each result. We have XSLT search result templates for various types of results including clients and people. For example purposes, I will explain using the people results.


Each result on the search results page has an ID that contains CoreResultListItem. This is set in the search results XSLT. The first thing that needs to be done is to insure that the search results template has a  <div> running at the server.
<div runat="server" class="people" id="{concat('CoreResultListItem',id)}" accountname="{accountname}" >

Since I am dealing with multiple types of results together, I set the class="people" so I know its a person. Next I use an identifying field so I know which person to display the information about. Here I am using {accountname} which is one of the managed properties for people results.

Once that is in place, I created a non visual web part that will sit on the search results page and handle the "tooltipification". The main method I created was AddControls loops through the search results and adds the tooltip to each result using an ASCX User Control. This user control displays information about the person as the accountname will be passed into the control. This control runs separate from the web part (see examples on the Telerik RAD Controls site if you need more info).

A condensed version is shown here:

 private void AddControls(ControlCollection page)
{
   foreach (Control c in page)
    {
     if (c.ClientID != null)
      {
        if (c.ClientID.Contains("CoreResultListItem"))
        {
           RadToolTip tooltip = new RadToolTip();
           tooltip.ShowEvent = ToolTipShowEvent.OnMouseOver;
           tooltip.TargetControlID = c.ClientID;
           tooltip.IsClientID = true;
           tooltip.ID = "RadToolTip" + c.ID;
           tooltip.HideEvent = ToolTipHideEvent.LeaveToolTip;
 
           switch ((c as HtmlGenericControl).Attributes["Class"])
          {
                case "people": //Person

                 Control ctrlPerson = Page.LoadControl("~\\UserControls\\PublicContactCardSearch.ascx");
                PublicContactCardSearch.PublicContactCardSearch detailsPerson =
                             (PublicContactCardSearch.PublicContactCardSearch)ctrlPerson;
                if ((c as HtmlGenericControl).Attributes["accountname"] != null)
               {
                    if ((c as HtmlGenericControl).Attributes["accountname"] != string.Empty)
                   {
                         detailsPerson.ADAccount = (c as HtmlGenericControl).Attributes["accountname"];
                         tooltip.Controls.Add(ctrlPerson);
                        c.NamingContainer.Controls.Add(tooltip);
                    }
               }
               break;
     
         case "client": //Client           
                     .... SIMILIAR CODE FOR EACH TYPE OF RESULT

          }
       }
     }
     if (c.HasControls())
     {
           AddControls(c.Controls);
     }
    }
}

I then call this in the CreateChildControls method:

AddControls(Page.FindControl("ctl00").Controls);

The "ctl00" is the master page so I pass in the controls collection of the master page. The AddControls method is recursive which isn't favorable but was the only way I could get to the search result items.

When switching search results pages using the paging, I noticed the tooltips were showing from the orignal page. Therefore I needed to make sure that the control states were clear:

ClearChildControlState();
ViewState.Clear();

I used both of these in the Page_Load and the ClearChildControlState() in the Render method as well.

The results (although my picture looks goofy):


If you found this useful, please help support my SharePoint and .NET user group (Philly SNUG) by clicking on the logo below.

Sunday, June 26, 2011

Keep Your Android Running All Day

I just wrote and published a little guide to help keep your Android-powered smart phone running all day without charging. http://amzn.to/mE4sFe

It is currently only available in Kindle but the hard copy will be available soon.

Thursday, March 24, 2011

IMNRC in UpdatePanel - Postback Issue Resolved

Issue Premise
When using IMNRC within an Ajax based UpdatePanel, the Communicator/Lync presence appears fine upon initial load. Once a post back occurs, the presence indicators render as offline images and the communication menu is not available. This is the exact issue discussed in the Microsoft forums here.

Scenario
I created a tabbed version of the Smart Part web part. This tabbed version renders various configurable tabs, and just like the Smart Part, loads the selected aspx user control. I use an UpdatePanel to load the controls and perform partial post backs when a different tab is selected.

One of the controls I created for use within this tabbed web part is a list of users based on certain filters or criteria. I generate the users using the presence image calling the IMNRC javascript function within the onload parameter. As described in the Issue Premise, upon initial rendering, the indicators function normally. When I click on a different tab and then come back to the list of users, all of the images go "offline" and there is no more drop-down menu available.

Root Cause
The root cause lies within the IMNRC function during a postback. The objects are not set properly for conditions to render the proper code. The orginal poster of the problem found that commenting out a condition in the IMNRC function allowed the presence to persist upon postbacks. I was able to reproduce his solution and it did work but I noticed that even though the indicators showed the users' status, I no longer had the communicator menu after a postback. So the loss of functionality as well as the editing of system javascript would not work for me.

Solution
My solution involved four steps:

1) Copying and tweaking the IMNRC function to handle postbacks
2) Renaming the IMNRC function to something else (e.g. CustomIMNRC)
3) Including the new function in my control markup or including in a referenced custom .js file
4) Modifying the onload parameter of the img tag to use the new function name.

The tweaking of the IMNRC function involves creating a new variable named postback and setting that to true:

var objSpan = obj;
var id = obj.id;
var fFirst = false;
var postback = true;


Next change the fFirst variable to postback in one of the lower if conditions:

if (postback && EnsureIMNControl() && IMNControlObj.PresenceEnabled) {
var state = 1, img;
state = IMNControlObj.GetStatus(name, id);

....
Finally add || postback to the last if (fFirst) condition: {this block of code allows the communicator menu to appear over the image when moused over}

if (fFirst || postback) {
var objRet = IMNGetOOUILocation(obj);
objSpan = objRet.objSpan;

...
The full function is show below: (use it in as script in your markup or include in a reference .js file)

function CustomIMNRC(name, elem) {
        if (name == null || name == '')
            return;
        if (browseris.ie5up && browseris.win32) {
            var obj = (elem) ? elem : window.event.srcElement;
            var objSpan = obj;
            var id = obj.id;
            var fFirst = false;
            var postback = true;
            if (!IMNDictionaryObj) {
                IMNDictionaryObj = new Object();
                IMNNameDictionaryObj = new Object();
                IMNSortableObj = new Object();
                IMNShowOfflineObj = new Object();
                if (!IMNOrigScrollFunc) {
                    IMNOrigScrollFunc = window.onscroll;
                    window.onscroll = IMNScroll;
                }
            }
            if (IMNDictionaryObj) {
                if (!IMNNameDictionaryObj[id]) {
                    IMNNameDictionaryObj[id] = name;
                    fFirst = true;
                }
                if (typeof (IMNDictionaryObj[id]) == "undefined") {
                    IMNDictionaryObj[id] = 1;
                }
                if (!IMNSortableObj[id] &&
    (typeof (obj.Sortable) != "undefined")) {
                    IMNSortableObj[id] = obj.Sortable;
                    if (!bIMNOnloadAttached) {
                        if (EnsureIMNControl() && IMNControlObj.PresenceEnabled)
                            window.attachEvent("onload", IMNSortTable);
                        bIMNOnloadAttached = true;
                    }
                }
                if (!IMNShowOfflineObj[id] &&
    (typeof (obj.ShowOfflinePawn) != "undefined")) {
                    IMNShowOfflineObj[id] = obj.ShowOfflinePawn;
                }
                if (postback && EnsureIMNControl() && IMNControlObj.PresenceEnabled) {
                    var state = 1, img;
                    state = IMNControlObj.GetStatus(name, id);
                    if (IMNIsOnlineState(state) || IMNSortableObj[id] ||
     IMNShowOfflineObj[id]) {
                        img = IMNGetStatusImage(state, IMNSortableObj[id] ||
           IMNShowOfflineObj[id]);
                        IMNUpdateImage(id, img);
                        IMNDictionaryObj[id] = state;
                    }
                }
            }
            if (fFirst || postback) {
                var objRet = IMNGetOOUILocation(obj);
                objSpan = objRet.objSpan;
                if (objSpan) {
                    objSpan.onmouseover = IMNShowOOUIMouse;
                    objSpan.onfocusin = IMNShowOOUIKyb;
                    objSpan.onmouseout = IMNHideOOUI;
                    objSpan.onfocusout = IMNHideOOUI;
                }
            }
        }
    }


If you found this useful, please help support my SharePoint and .NET user group (Philly SNUG) by clicking on the logo below.

Matched Content