Friday, August 12, 2011

Office 365: Changing the Domain of the Admin Account

When you first sign up for Office 365, an admin account is created using the Microsoft Online domain. After you add a custom domain to your Office 365 service you may want to change the initial user to use that domain as well. You can't modify the domain of the admin user while you are logged in as the admin.

Therefore, you must create a new user account with administrative privledges:


Once you have created a new user with admin privledges, login as that user and then modify the original Admin user:


You may now change the domain of the initial admin user:


Catch more Office 365 tips and tricks in Steve's Office 365 Walkthough Guide.

Follow Steve on Twitter @stevethemanmann

Friday, August 5, 2011

Office 365: Modifying Your Website Styles in 30 seconds

Your Office 365 Website uses a default stylesheet named theme.css. When you change the color scheme of your website, the color changes are reflected within this file. You may customize the CSS in this file and apply it to your web site in several quick and easy steps.

With your web site in edit mode, click the Style Sheet button from the Design ribbon:


The Style Sheet dialog appears:


This first looked scary to me. I am not one of those blank CSS guys that just crank out styles from nowhere. And besides, which styles are being used? Have no fear - this is easier than it appears.

Click on the View default CSS link at the top of the dialog. Your browser will prompt whether to Open or Save the file:


If you want you can save off a copy but for my purposes I just clicked Open. If you are cool enough to have SharePoint Designer (SPD) installed, the theme.css file will open within SPD. Otherwise you may open it up using Notepad or any other design program you have (it is only text).


You may make modifications here in the file, save a local copy, and then copy the contents to your clipboard.

Note: Modifying specific text and background colors within a widget or header, as examples, overrides the styles defined in the theme.css regardless if default or custom CSS is being applied.

Return to the Style Sheet dialog and check the Apply custom CSS checkbox. Paste the CSS contents into the box.


Click OK. Your web site is updated to use the customized CSS.

So overall you do need to spend time to figure out what styles you want to change and what you want to change them to (which may take longer than 30 seconds) but the overall process of updating the styles to custom CSS is a breeze. So far I am content with simply changing the Color scheme of the web site without having to dork around with the CSS since I am only changing colors anyway, but I will soon have my designer take a look and see what he thinks..stay tuned...


Catch more Office 365 tips and tricks in Steve's Office 365 Walkthough Guide.

Follow Steve on Twitter @stevethemanmann
If you found this useful, please help support my SharePoint and .NET user group (Philly SNUG) by clicking on the logo below.

Tuesday, August 2, 2011

Office 365 Ramp-up Tips

Here are a list of tips that come to mind as I think about people getting started and ramped-up on Office 365. (Some of these pertain only to the Professionals and Small Businesses Edition)

1) Sign-up using an Admin user name
If you plan on using a custom domain with Office 365, you probably want your email to be "name@mydomain.com" and not using the Microsoft Online domain. The initial user that is generated upon sign up is an administrator but is set to the Microsoft Online domain. This can be changed but you need to login as another user with administrative privledges and then change the initial user. If you attempt to change the initial user while being logged in as that user, the username and domain name selection is disabled:


Therefore I find it easier to call the initial user Admin and then create a user for myself (with admin rights) after I add the custom domain to Office 365.

2) First Step After Sign Up - Add/Integrate Your Domain
After initial sign-up and sign-in, the next thing you should do is add your domain to Office 365. Do this before anything else. This will make life much easier. You do not want to add users and then have to switch their domain from the Microsoft Online domain to your custom domain. The username and domain affects everything within Office 365 including Exchange/Outlook Online, Lync Online, and SharePoint online. Again, life will be much easier if you add/integrate your domain first before doing anything else. (see my post here for adding a custom domain)

3) TeamSite URL
SharePoint Online provides the ability to change the name and URL of the TeamSite. This is achieved by selecting Site Settings from the Actions menu and then clicking Title, Description, and Icon under Look and Feel.

However, the TeamSite URL is used and expected in many places within Office 365 (including links on the user pages). Therefore, although it is OK to change the name of the site, I recommend not changing the URL of the TeamSite. This will break links and cause confusion if not user frustration.

4) Website Site Settings (Professionals and Small Businesses Edition)
When you navigate to the Website site within SharePoint Online, you may notice that the Actions menu has less options than on the TeamSite.


However, you may still get to Site Settings if you wish by using the URL access. Simply add _layouts/settings.aspx to the end of the current URL:


Corey Roth eluded to this already in his Office 365 Grid post here. If you are a SharePoint expert like us then you may use the same philosophy to access other SharePoint system pages.

5) Removing the Quick Launch
If you do not want the Quick Launch to show on your TeamSite or any of your sub-sites, there is an option to enable/disable it - but it is not where you think. You would think it is under Quick Launch from the Look and Feel section of Site Settings, but it is actually under the Tree View link:


The Tree view page has the option to Enable the Quick Launch:


Simply uncheck the Enable Quick Launch option and click OK to remove the Quick Launch from the current site.

6) Keep Cranking on Your Public Website
As you modify and customize your public Website, use the quick buttons at the top left of the screen to quickly save & publish and/or preview your changes.


Made a mistake? Use the Close the Web page menu item from the File ribbon menu and don't save any changes. Re-open the page to continue modifying.


7) Editing Website Pages
You do not need to edit each page one-at-a-time and then go back to the SharePoint Pages library to open and modify the next one. Simply use your web site navigation to go to the next page in edit mode:


8) Removing the Member Login
The Member Login menu item navigates to your internal TeamSite and thus prompts the user for authentication. You may remove this if you do not want it to appear. First, click Setup from the Design ribbon:


The Setup dialog appears. Uncheck the Display "Member Login" button in navigation option and click OK.


The Member Login menu item is removed from the web site navigation.

9) Logo vs. Theme Image
When modifying the Header, you may notice a Logo tab that may be used to upload and use a logo image on the header:


This is not the image that appears on the left of the header (out-of-the-box displays an airplane propeller). The image that appears on the left is the theme image. This may be changed by using the Theme drop-down menu from the Design ribbon:


Upload an image or use one of the many stock images available (or no image at all).


10) Walkthrough Guide
Of course I need to throw in some promotional material here. Last but not least on my list is to make sure you have my walkthrough guide besides you to help you walkthrough and ramp-up on Office 365.


Catch more Office 365 tips and tricks in Steve's Office 365 Walkthough Guide.

Follow Steve on Twitter @stevethemanmann
If you found this useful, please help support my SharePoint and .NET user group (Philly SNUG) by clicking on the logo below.

Monday, August 1, 2011

Office 365: Installing and Updating Lync Online

Installing Lync is part of the user boarding process which I explain in my guide. Each user receives a temporary password for Office 365 so it is important for them to login and change their password.
Once the user has updated their password and are logged into Office 365, it is time to setup the computer for Office 365 use. In the Start here list, click the Set up now link on line #1.


The Downloads page appears. The first step is to download and install Microsoft Lync 2010.


Select the Language and the Version for the computer and click on Install. You are prompted to Run or Save the Lync setup package. Click Run. Once downloaded, the Micrsoft Lync 2010 Setup is launched.


Click Install. Since Internet Explorer is running you are prompted to close the application.Click OK.


Microsoft Lync 2010 begins installation. 


Once the install is complete, the setup displays Install succeeded. Make sure Start Lync is checked and click Close.


The communicator icon appears in your task bar but you may need additional software updates before continuing.


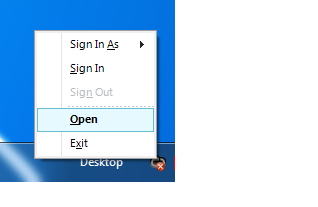
After installing Microsoft Lync 2010, your computer may need software updates for Lync 2010 to run. Right-click the communicator icon on your task bar and select Open.


The Microsoft Lync window opens. Click on the Download and install now? link to install the additional software that is required. 


When prompted to Run or Save, click Run.

The software is downloaded and the Microsoft Online Services Sign-in Assistant Setup launches.


Check the acceptance check box to agree the License Agreement and click Install. The software is installed.


On the completion dialog click Finish. Go back to the Lync sign in and click Sign in.

You are signed into Lync 2010 and the main Lync dashboard appears.


A Microsoft Lync 2010 tutorial is also launched.


Click the start here link in the lower left-hand corner.

Each user should run through the tutorial and setup. There are navigation links in the lower left-hand corner of the screens to start and move to the next step.


Once completed, click the exit link in the lower left-hand corner. Lync 2010 is now installed, setup, and configured for use.


Catch more Office 365 steps in Steve's Office 365 Walkthough Guide.

Follow Steve on Twitter @stevethemanmann


Adding a Custom Domain to Office 365

If you have not registered for a custom domain, you may use the many providers on the internet such as the Domain Registry of America (www.droa.com). You will first need to determine if the domain name is available and then go through the purchasing procedures accordingly. Since I already have stevethemanmann.com and use that for my blog site, for my walkkthrough guide I created a new domain of “stevethemanmann.net”. After making the purchase, it could take several hours before your domain name is ready and available for configuration.

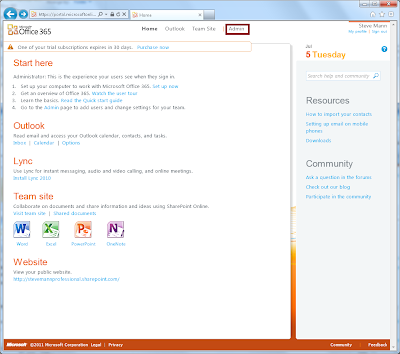
When you know your domain name is ready, return to your Office 365 home page and click on the Admin menu item at the top of the page.


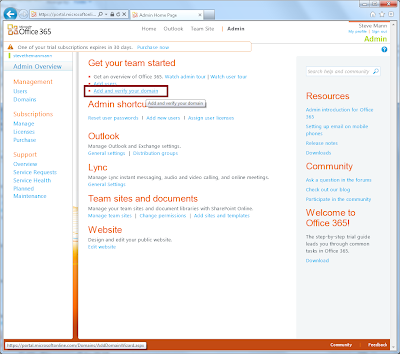
The Admin screen appears. Under Get your team started, click on the Add and verify your domain.


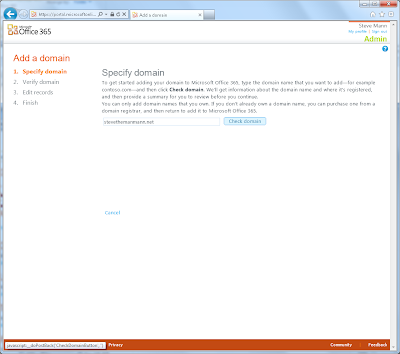
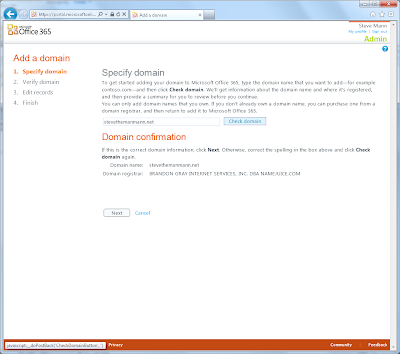
The Add a Domain screen appears. Enter your custom domain in the text box and click Check domain.


Your domain will be verified and a Domain Verification appears on the screen.


Click Next. The Verify Domain screen appears. Although the TXT record method is preferred, in my case I needed to use the MX record method. Read the directions carefully on this screen.


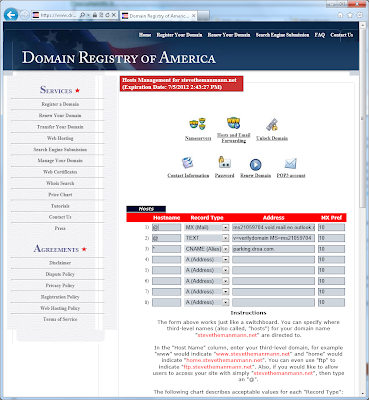
 You need to modify the host settings within your domain configuration from your provider.


Once you modify the settings, return to the Verify Domain screen and click Verify. You may need to wait a few minutes before your domain can be verified. 

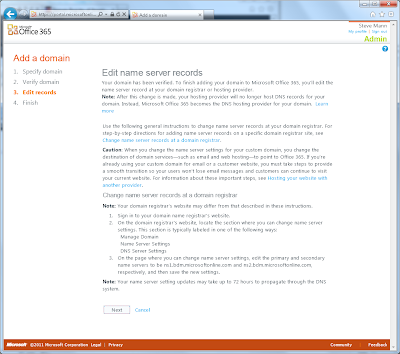
Once verified, the Edit Name Server screen appears. Read the directions carefully. Again you will need to configure your domain and modify the Nameservers settings.


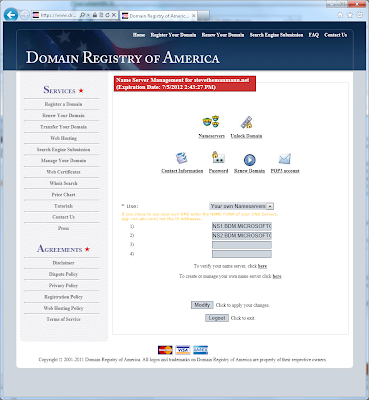
The Nameserver names are listed on the Office 365 screen (in Step #3). Enter these values into your domain configuration and accept the changes.

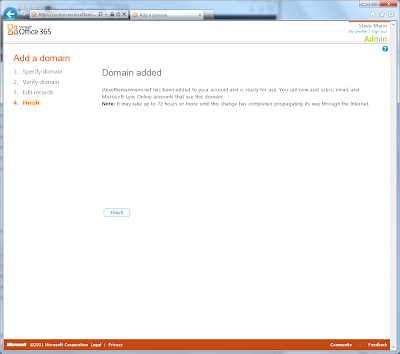
Back on the Office 365 screen, click Next. The Domain is added and a confirmation screen appears.


Click Finish. The Domains screen appears and now your custom domain is listed.


Catch more Office 365 steps in Steve's Office 365 Walkthough Guide.

Follow Steve on Twitter @stevethemanmann


Using the Rad Ajax Loading Panel in SharePoint with a Rad Grid

I implemented a Rad Grid which contained two levels of information within a user control that is being rendered in SharePoint (MOSS 2007). I therefore used coding and markup as explained on the Telerik demo site here. When expanding the master rows to expose the "child" rows, the detail data is loaded on demand via the DetailTableDataBind event. In our situation this took a few seconds and therefore I wanted something to show that data was loading. Enter the Rad Ajax Loading Panel.

The RadAjaxLoadingPanel object looked like a great fit. By default it presents a nice loading animation similiar to what I have seen in Silverlight. I therefore attempted to implement the loading panel for my situation. I followed examples as explained here.

While running the example code locally within a .NET Framework environment, the Rad Ajax Loading Panel worked like a charm. However, when attempting to run the same code within SharePoint, I was not so lucky. At first I was seeing the loading panel on the first postback but never again and in certain configurations based on examples, I did not see it appear at all.

Finally, I was able to get it all to work within SharePoint. Here is how my markup ended up being structured:

1) First I declared the RadAjaxLoading Panel.
<telerik:RadAjaxLoadingPanel runat="server" ID="RadAjaxLoadingPanel1" MinDisplayTime="200" ZIndex="1" EnableTheming="false" Skin="Default">
</telerik:RadAjaxLoadingPanel>

2) Next I needed to wrap everything else within a RadAjaxPanel. I believe this was the key to having everything work in SharePoint.

<telerik:RadAjaxPanel runat="server" ID="AjaxPanel">

3) Now comes the RadAjaxManager which controls when to show the loading panel. <telerik:RadAjaxManager ID="RadAjaxManager1" runat="server"
EnablePageHeadUpdate="False">
  <AjaxSettings>
    <telerik:AjaxSetting AjaxControlID="RadGrid1">
      <UpdatedControls>
         <telerik:AjaxUpdatedControl ControlID="RadGrid1" LoadingPanelID="RadAjaxLoadingPanel1" />
      </UpdatedControls>
     </telerik:AjaxSetting>
   </AjaxSettings>
</telerik:RadAjaxManager>

4) Then I have all my grid goodness which I will spare all the details.

<telerik:RadGrid ID="RadGrid1" runat="server" Width="100%" ShowStatusBar="true" AutoGenerateColumns="False" AllowSorting="True" AllowMultiRowSelection="False"
AllowPaging="True" OnDetailTableDataBind="RadGrid1_DetailTableDataBind" OnItemDataBound="RadGrid1_ItemDataBound"
OnNeedDataSource="RadGrid1_NeedDataSource" EnableEmbeddedSkins="false" EnableViewState="true">

.......GRID MARKUP HERE
</telerik:RadGrid>


4) Finally I have the closing RadAjaxPanel tag.
</telerik:RadAjaxPanel>


This sequence of markup allowed the loading panel animation to display everytime there was a postback to get the detail data without refreshing the entire page within SharePoint. As I said above, I think the key was wrapping the Ajax Manager and the Rad Grid within a Rad Ajax Panel which was not needed or shown in the Telerik demos.
If you found this useful, please help support my SharePoint and .NET user group (Philly SNUG) by clicking on the logo below.

Matched Content