Installing Lync is part of the user boarding process which I explain in my guide. Each user receives a temporary password for Office 365 so it is important for them to login and change their password.
Once the user has updated their password and are logged into Office 365, it is time to setup the computer for Office 365 use. In the Start here list, click the Set up now link on line #1.
Click Install. Since Internet Explorer is running you are prompted to close the application.Click OK.
Once the install is complete, the setup displays Install succeeded. Make sure Start Lync is checked and click Close.

The communicator icon appears in your task bar but you may need additional software updates before continuing.
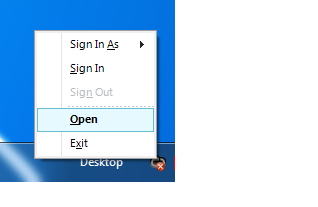
After installing Microsoft Lync 2010, your computer may need software updates for Lync 2010 to run. Right-click the communicator icon on your task bar and select Open.
The Microsoft Lync window opens. Click on the Download and install now? link to install the additional software that is required.
When prompted to Run or Save, click Run.
Check the acceptance check box to agree the License Agreement and click Install. The software is installed.
On the completion dialog click Finish. Go back to the Lync sign in and click Sign in.
You are signed into Lync 2010 and the main Lync dashboard appears.
A Microsoft Lync 2010 tutorial is also launched.
Click the start here link in the lower left-hand corner.
Each user should run through the tutorial and setup. There are navigation links in the lower left-hand corner of the screens to start and move to the next step.
Once completed, click the exit link in the lower left-hand corner. Lync 2010 is now installed, setup, and configured for use.
Catch more Office 365 steps in Steve's Office 365 Walkthough Guide.
Follow Steve on Twitter @stevethemanmann
Once the user has updated their password and are logged into Office 365, it is time to setup the computer for Office 365 use. In the Start here list, click the Set up now link on line #1.
The Downloads page appears. The first step is to download and install Microsoft Lync 2010.
Select the Language and the Version for the computer and click on Install. You are prompted to Run or Save the Lync setup package. Click Run. Once downloaded, the Micrsoft Lync 2010 Setup is launched.
Click Install. Since Internet Explorer is running you are prompted to close the application.Click OK.
Microsoft Lync 2010 begins installation.
Once the install is complete, the setup displays Install succeeded. Make sure Start Lync is checked and click Close.

The communicator icon appears in your task bar but you may need additional software updates before continuing.
After installing Microsoft Lync 2010, your computer may need software updates for Lync 2010 to run. Right-click the communicator icon on your task bar and select Open.
The Microsoft Lync window opens. Click on the Download and install now? link to install the additional software that is required.
When prompted to Run or Save, click Run.
The software is downloaded and the Microsoft Online Services Sign-in Assistant Setup launches.
Check the acceptance check box to agree the License Agreement and click Install. The software is installed.
On the completion dialog click Finish. Go back to the Lync sign in and click Sign in.
You are signed into Lync 2010 and the main Lync dashboard appears.
A Microsoft Lync 2010 tutorial is also launched.
Click the start here link in the lower left-hand corner.
Each user should run through the tutorial and setup. There are navigation links in the lower left-hand corner of the screens to start and move to the next step.
Once completed, click the exit link in the lower left-hand corner. Lync 2010 is now installed, setup, and configured for use.
Catch more Office 365 steps in Steve's Office 365 Walkthough Guide.
Follow Steve on Twitter @stevethemanmann


No comments:
Post a Comment