Friday, December 21, 2012

SharePoint 2013: Videos in SharePoint without Videos in SharePoint

Introduction
Videos are now supported within SharePoint 2013 via a new content type (to add video support to your site collection see this post). This means that video files may be uploaded to SharePoint and playable within a SharePoint site. However, the actual files do not need to actually live in SharePoint itself. A Video library can be populated simply from links to video content.

After returning from the Microsoft SharePoint Conference 2012 in Las Vegas, we downloaded most of the videos of the sessions and content. This collection of videos (as well as any collection of videos) takes up gigs and gigs of disk space. So if we uploaded them all into SharePoint, our content database would bloat to an unmanagable size. So where did we save them?

Network Server
We saved the videos and content to a network server such that people can access them from there, however, we thought it would nice to access the videos through SharePoint 2013 since it now supports the streaming of videos.

IIS Web Site
On the SharePoint 2013 box in a staging environment, we cracked open IIS and created a new web site named "Videos":

We pointed the Videos physical path to the network UNC shared folder:

 
So now we can access videos from the browser using http://sharepointroot/Videos/....
 
That was the first step.
 
 
Video Library
The next step was to add a library to our SharePoint site to add the video links. This is done by creating a Video Library which is accomplished by "Adding an app" from the Settings menu:


Select the Asset Library App:

Provide a name and click Create:


This process created the Video Library. Our actual library is just called Videos.


Adding Videos to the Videos Library via Links
When you intially navigate to the Videos Library and click on "new item", there is an assumption that you are uploading a file. In our case, we did not want to upload video files but simply add links to those video files.

We accomplished this by using the New Document menu from the Files top ribbon and selecting Video:


Selecting Video provides several options. We selected "Provide a link to a video" and then entered the http:// path of the video using our new Video web site in IIS:


Clicking OK brings you to a properties screen where you may set a thumbnail as well as other Video properties.

We continued this process for all of the videos available on our network share and loaded up the Video Library:

 
User Experience
We now can provide video content to people through SharePoint and have them watch the video stream right within the SharePoint site:


The experience is that the video is in SharePoint even though it technically does not live within SharePoint!!!

You may also do something similiar with external videos (such as YouTube) using the embed option. An example of this is shown here.


An example of search results from embedded videos:


You may Enhance your Video Search Results very easily. The details are here.


Thursday, November 8, 2012

InfoPath 2007/2010/2013: Dynamically Populate a Nested Repeating Table from a Secondary Data Source

This post builds on top of my original population of repeating table post. I had a reader ask about a nested solution in which the repeating group not only contained fields, but yet another repeating group.

The scenario of the form fields looks like the following:


In my examples (on my blog and in my InfoPath How-To book), I used Regions and Offices as data sources (they are SharePoint lists but web services or other data sources work the same way - just different XPath). Offices has a lookup column for the Region.

For the nested scenario, I decided to create a third datasource named Clients. The Clients have a relationship to Offices. Therefore, in my Clients SharePoint list, I have a lookup column to Offices. The overall relationships are:
  • Regions can have one-to-many Offices (An Office can only have one Region)
  • Offices can have one-to-many Clients (A Client can only belong to one Office)

My Clients data source contains the Client Name (Title), Address, and Phone along with the Office field which is the Office ID:


So now, when I select a Region from the drop-down in my form, I want to get the Offices for that Region along with all of the Clients that belong to that Office. Since it's a nested structure it calls for a nested loop within the Populating code-behind (see my previous post for context):

(click on image to zoom in)


The nested loop code involves these steps:
  • Creating the data source object for the Clients list
  • Setting the query value to the current Office ID
  • Executing the query against the data source
  • Looping through the data source results and populating the nested repeating table structure
The results speak for themselves:


 I will have more details on these steps as well as downloadable code in my upcoming InfoPath with SharePoint 2013 How-To book! Stay tuned!


Thursday, October 4, 2012

Installing Office Web Apps Server for SharePoint 2013


Check out the whole SharePoint 2013 Solution Series
New Titles Added Weekly!

I wanted to evaluate Office Web Apps Server in SharePoint 2013 so I could see what the document previews would look like and understand the overall editing functionality. Therefore, I hijacked one of my staging servers and decided to install Office Web Apps Server. The server you choose can't have SharePoint running on it or any web application running on port 80. Also, Microsoft Office (or any Office component) cannot be installed.

The OS on my server was Windows Server 2008 R2 so I had to follow those directions. For Windows Server 2008 R2 you need to have the following:

  • Windows Server 2008 R2 Service Pack 1 and all required updates

  • .NET Framework 4.5 RC

  • Windows PowerShell 3.0

  • KB2592525

  •  
    Apparently this server did not have PowerShell 3.0 or the KB2592525 patch. So I needed to download and install those items first.
     
    Then I needed to run add the proper roles using the following in PowerShell:
     
    Import-Module ServerManager


    Add-WindowsFeature Web-Server,Web-WebServer,Web-Common-Http,Web-Static-Content,Web-App-Dev,Web-Asp-Net,Web-Net-Ext,Web-ISAPI-Ext,Web-ISAPI-Filter,Web-Includes,Web-Security,Web-Windows-Auth,Web-Filtering,Web-Stat-Compression,Web-Dyn-Compression,Web-Mgmt-Console,Ink-Handwriting,IH-Ink-Support


    I noticed in the output as shown in the image, that a restart was needed. So I did not even take a chance and rebooted the server.
     
    Next it was time to install the Office Web Apps Server. I just searched for the product and found the download:


    I downloaded the package and ran the installation - pretty straightforward.


    Next it was time to create the new Office Web Apps Farm on the server via PowerShell. Since this was for evaluation purposes, I used the test environment configuration:
     
    Import-Module OfficeWebApps
    New-OfficeWebAppsFarm –InternalURL http://servername –AllowHttp -EditingEnabled


     Since I enabled editing, I needed to confirm the operation:
     

    The operation resulting with all of the properties being displayed:


    The next step was to test the Office Web Apps server using a browser to confirm that http://servername/hosting/discovery produced a wopi-discovery response. It did:


    So that was it on the Office Web Apps server side. Now I needed to switch the the SharePoint 2013 server and do some magic there.


    Create the new binding:
    New-SPWOPIBinding -ServerName <WacServerName> -AllowHTTP


    Set the zone:
    Set-SPWopiZone –zone “internal-http”

    If you are using HTTP, you need to allow OAuth over HTTP by using the following commands:

    $config = (Get-SPSecurityTokenServiceConfig)
    $config.AllowOAuthOverHttp = $true
    $config.Update()


    I didn't need to do this previously but while I was setting up my production server, I ran into an OWA issue. The answer was to run the above commands which I found in a forum who received the information from here.


    That's it! Bring up a document library with Office documents:


    Search for Office documents: (may need to perform a full crawl before the preview kicks in)


    This was very easy to install and implement! I was very suprised it worked the first time. It took a bit for everything to warm up and work but I really did not have to do much fiddling!

    Reporting Services 2012 Integrated Mode with SharePoint 2013 "Scale Out" in Staging Environment

    We wanted to test out SQL Server Reporting Services within SharePoint 2013 but did not want to have everything running all on one server. We found some steps here but that essentially described a single server installation. Therefore we needed to figure out what we needed to do which wasn't too hard.

    Our staging servers included the following:

    Web Front End
    Database Server
    Reporting Server

    The Reporting Server is essentially an Application Server that is joined to the SharePoint farm. It will run the SSRS Service Application. Running SSRS integrated mode now means that it is fully under SharePoint (thus reducing any double-hop issues).

    Here is the high-level installation effort we implemented to make it work:


    Web Front End
    1. Install SP2013 Prereqs (aka SharePoint Preparation Tool)

    2. Install SharePoint Server

    3. SharePoint Products Configuration Wizard  - (Create new farm)

    4. Create Root Web Application (Port 80)

    5. Create Root Site Collection

    6. Create all Service Applications manually (this was for other purposes - Reporting services was not one them yet)


    Report Server


    1. Install SP2013 Prereqs (aka SharePoint Preparation Tool)


    2. Install SharePoint Server

    3. SharePoint Products Configuration Wizard (to join to Farm)

    4. Install SQL Server 2012 selecting both Reporting Services and the Reporting Services Add-In for SharePoint

    5. Install SQL Server 2012 SP1  for SharePoint 2013 Support

    You now need to register and start the SQL Server Reporting Services on the server using PowerShell commands within the SharePoint 2013 Management Shell (on the Report Server):

    Install-SPRSService
    Install-SPRSServiceProxy

    get-spserviceinstance -all |where {$_.TypeName -like "SQL Server Reporting*"} | Start-SPServiceInstance

    I originally did not have this documented and didn't realize I missed this part until I tried to add another Reporting Services server to the staging farm and the service did not appear in the Services for Server. Ahhh.

     
    Back on the Web Front End:

    1. Install SQL Server 2012 selecting ONLY the Reporting Services Add-In for SharePoint

    2. Install SQL Server 2012 SP1 for SharePoint 2013 Support

     
    Now in Central Admin, SQL Server Reporting Services appears as a new Service Application to create:


    Create the new SSRS Service Application.
     
    The Service Appears under Services on Server (only when looking at the Reporting Server):


    To add another Report Server to the farm, follow only the steps under the Report Server section.


    Wednesday, October 3, 2012

    SharePoint 2013: Document Library and Search Results Document Preview with Office Web Apps Server


    Check out the whole SharePoint 2013 Solution Series
    New Titles Added Weekly!

    I kept reading that if you have Office Web Apps Server up and running, you can connect it to your SharePoint farm and then, automagically, document previews will start appearing both in Search and in Document Libraries. I have not found any examples of what this document preview looks like so I had to take matters into my own hands.

    I finally installed Office Web Apps Server on one of our staging servers and connected it to a SharePoint 2013 farm in stage. After some warming up, the document previews for Office documents started working like a charm. For the Search Results, I needed to run a full crawl again. This is because the javascript in the Display Templates uses alternate URLs (defined by crawled properties) which take the Office Web Apps server and the document preview into consideration.

    I essentially followed the steps here: http://technet.microsoft.com/en-us/library/jj219455(v=office.15).aspx and used the standalone test environment section using Internal HTTP. I have some screenshots of the steps so I will probably post my installation journey as well. (UPDATE: The installation post is here.)

    However, I was so excited that the Office document preview worked that I wanted to share the results. Below are some screenshots.

    Search Results - Hovering over a Word document (click image to enlarge)


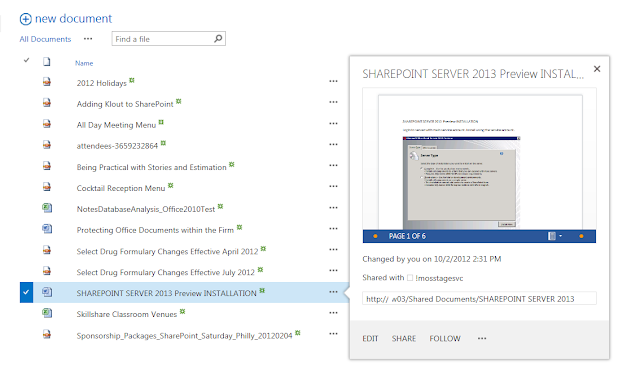
    Document Library - Selecting the elipsis (...) on a Word document library item (click image to enlarge)
     
    The previews under Office Web Apps server is only for Microsoft Office documents. Therefore PDF previews do not render. However, at least for the search results, I have a PDF Preview solution.


    The document preview is the "cool" part about Office Web Apps server but not the business value part. The business value is the ability to edit and work with Office documents in the browser without the need for local Office applications.

    What does this mean? This means that business users may interact with Office documents through SharePoint directly in the browser on any device. So whether it is a laptop, desktop, smart phone, or iPad - there are no constraints in making those last minute edits.


    Tuesday, October 2, 2012

    SharePoint 2013: PDF Preview in Search Results


    Check out the whole SharePoint 2013 Solution Series
    New Titles Added Weekly!

    Introduction
    One of the enhancements in SharePoint 2013 Enterprise Search results is the ability to preview documents using Office Web Apps Server. I am in the process of seeing what that looks like and will post an Office Web Apps server entry soon. UPDATE: Here is the post.

    Anyway, the issue is that if you have Office Web Apps configured, the only documents that show previews are Microsoft Office documents (e.g. Word, Excel, etc.). The preview of PDF documents is not implemented or supported using Office Web Apps.

    Therefore, I created my own PDF preview for Enterprise Search results by customizing the new search Display Templates. This works for local site search results too which I explain at the bottom of this post.

    To understand overall PDF functionality and behaviors, read the whole story here.

    Prerequisites
    Here are some things you need in place before implementing this solution:

    • Enterprise Search Application configured and running
    • Crawled content that includes PDF documents
    • Enterprise Search Center site collection
    • SharePoint Designer 2013


    Modifying the PDF Search Result Template
    This is the main effort and is fairly easy. I found it better to modify the templates using SharePoint Designer 2013 although they are accessible through the SharePoint master page UI.

    Step 1: Fire up SharePoint Designer 2013 and Open the Search Center Site


    Step 2: Click on All Files from the left-hand navigation
    If you attempt to get the files from the Master Pages, you will not see any items once you get to the Display Templates folders.


    You will see the list of all files in the main window.

    Step 3: Double-click on the _catalogs folder in the main window
    This action displays the _catalogs structure under the left-hand navigation.


    Expand the _catalogs folder, then the masterpage folder, and then the Display Templates folder.

    Step 4: Click on the Search folder under Display Templates

     
    The list of Search display templates is shown in the main window area.

    Step 5: Right-click on Item_PDF_HoverPanel.html and select Edit File in Advanced Mode


    Step 6: Paste the following code within the most inner <div>


        <object data="_#= ctx.CurrentItem.Path =#_" type="application/pdf" width="500px" height="630px" >
           <p>It appears you don't have a PDF plugin for this browser/device.
          You can <a href="_#= ctx.CurrentItem.Path =#_">click here to
           download the PDF file.</a></p>
        </object>


    Note: You may find it better to use the following for width and height: width="100%" height="500px"


    I actually replaced the Render Header and Render Body divs with the object code.

    Step 7: Save the file
    When saving the file, you may get a warning about breaking from the site definition. Click OK.
    What happens behind the scenes is that the HTML changes are incorporated into the javascript version of the template (Item_PDF_HoverPanel.js).

    Step 8: Test results
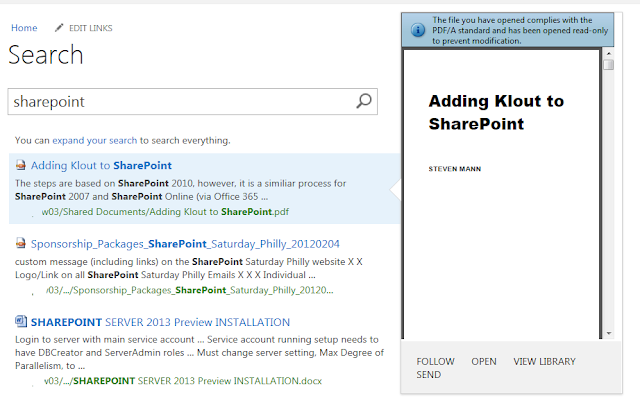
    Perform a search from your search center that produces PDF document results. Hover over the PDF document to see the preview:


    Currently the object tag uses hard-coded widths and heights. It is not using any responsive design styles. Me and my designer will be working on producing a more consistent respresentation for the PDF preview.

    Local Search Implementation
    There is still local site search results using the OSSSearchResults.aspx. You may implement the PDF Preview for these results as well but the modification is slightly different.

    You open the site in SharePoint Designer 2013 and navigate to the Display Templates in the same fashion. However, for local (non Enterprise Search sites) there are no HTML templates - only the javascript files. You may simply copy the javascript that was created in your Enterprise Search Center site collection (when you modified the HTML) or paste the following code:

    ,'    <object data="', ctx.CurrentItem.Path ,'" type="application/pdf" width="280px" height="430px">'
    ,'       <p>It appears you don\'t have a PDF plugin for this browser/device.'
    ,'       No biggie... you can <a href="', ctx.CurrentItem.Path ,'">click here to'
    ,'       download the PDF file.</a></p>'
    ,'    </object>'

    Save the file and preview the results by performing a local search in the SharePoint site.

    It appears that the hover container in this case is being constrained in regards to its size. Therefore  I needed to use 280px for width and 430px for height. I will be working on making this more flexible.


    To see what Office Web Apps server does for previewing of documents, see this post.
    For Installation steps, see this post.


    Matched Content